
Australian Flag Australian Sales & Support 1800 519 724

How to Get Your EPP Code on the HSJ Host Portal

If you’re transferring a domain away from HSJ Host to another registrar, you’ll be asked for an EPP code at some point during the process. It’s a standard part of any domain transfer, and generating one only takes a couple of minutes through the client portal. Here’s what it is and how to get hold of it.

What is an EPP code?

An EPP code (short for Extensible Provisioning Protocol code) is a unique authorisation code tied to your domain. It’s sometimes called a transfer code or auth code, and it exists purely to confirm that whoever is requesting a transfer actually has the right to move that domain.

When you start a transfer with a new registrar, they’ll ask you to enter the EPP code for the domain. Without it, the transfer can’t go ahead, it’s the domain equivalent of proving you’re the account holder before someone hands over the keys.

Not every domain extension uses an EPP code in the same way. Some, like most .au domains, use a similar authorisation process but may not require a separate code in every case. If you’re unsure whether your domain needs one, your new registrar will usually tell you exactly what’s required to complete the transfer.

Before you request an EPP code

A couple of things worth checking first.

  • Your domain needs to have Registrar Lock switched off before a transfer can go through. The EPP code alone won’t be enough if the lock is still enabled.
  • Domains generally can’t be transferred within 60 days of initial registration, or within 60 days of a previous transfer. If your domain falls into either category, you’ll need to wait before a transfer can proceed.
  • Make sure the contact email on the domain is current, since EPP codes are sometimes sent via email rather than shown directly in the portal, depending on the domain extension.

How to get your EPP code

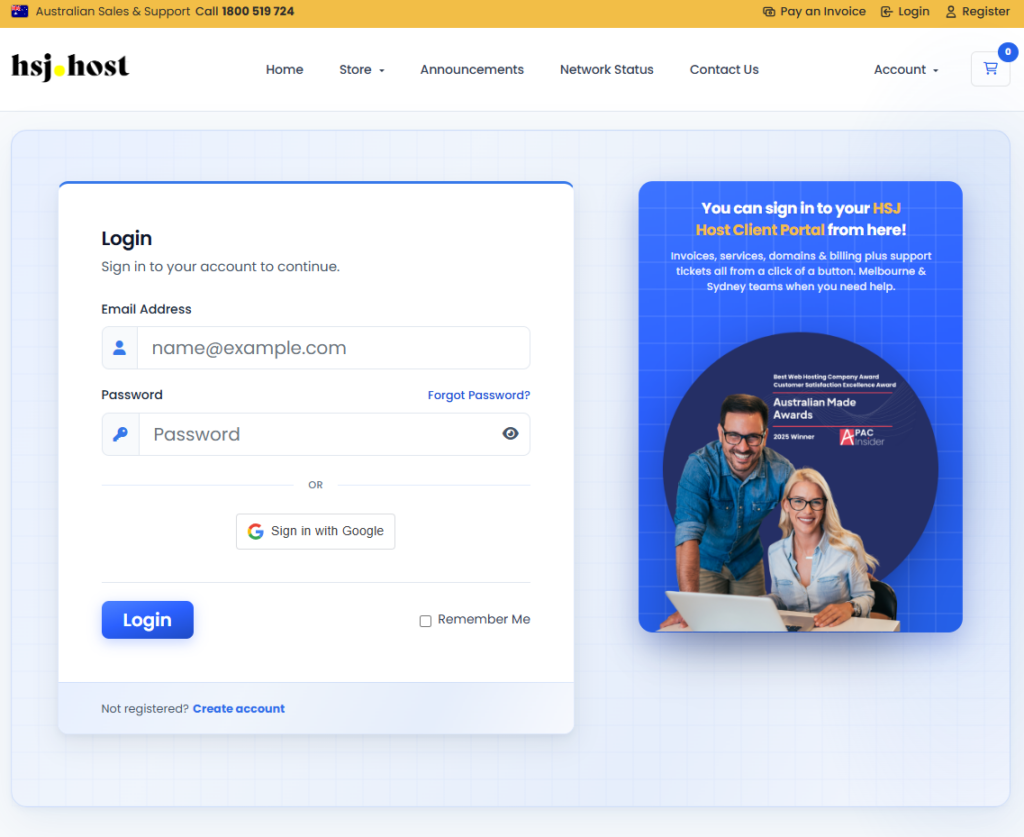
Step 1, log in to the client portal

Go to the HSJ Host client portal and log in with your account details.
Step 2, open your domain list

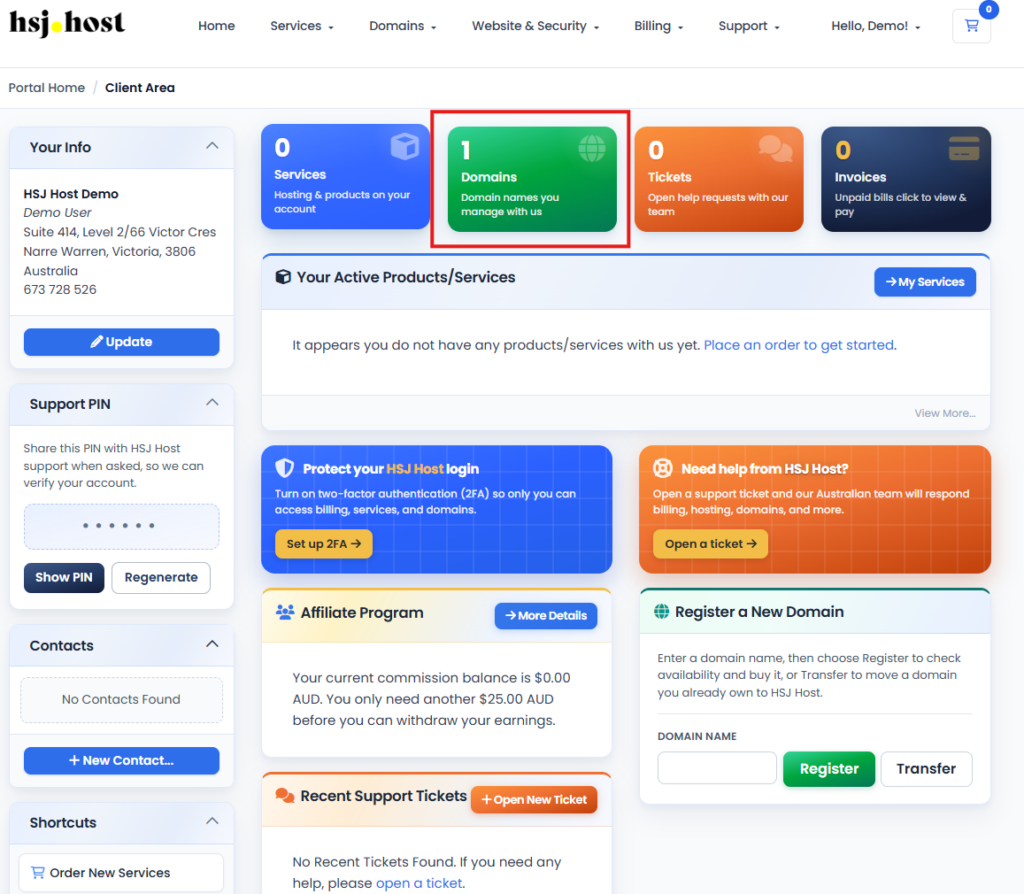
Go to the Domains menu and select My Domains to see every domain on your account.
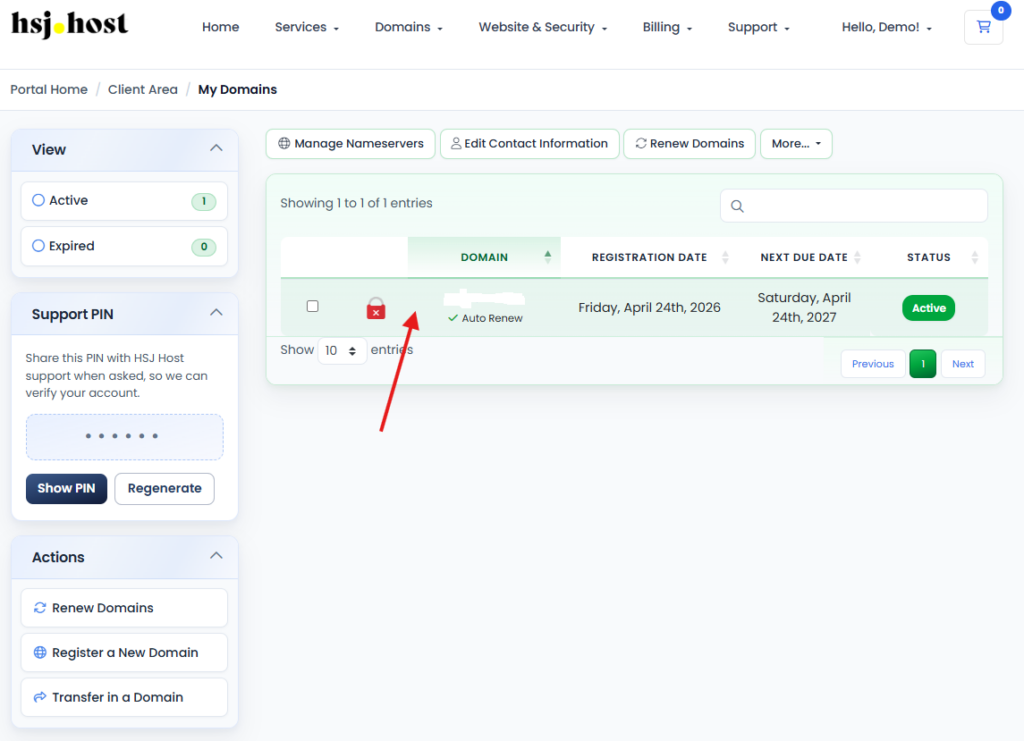
Step 3, select the domain

Click on the domain you need the EPP code for to open its management page.

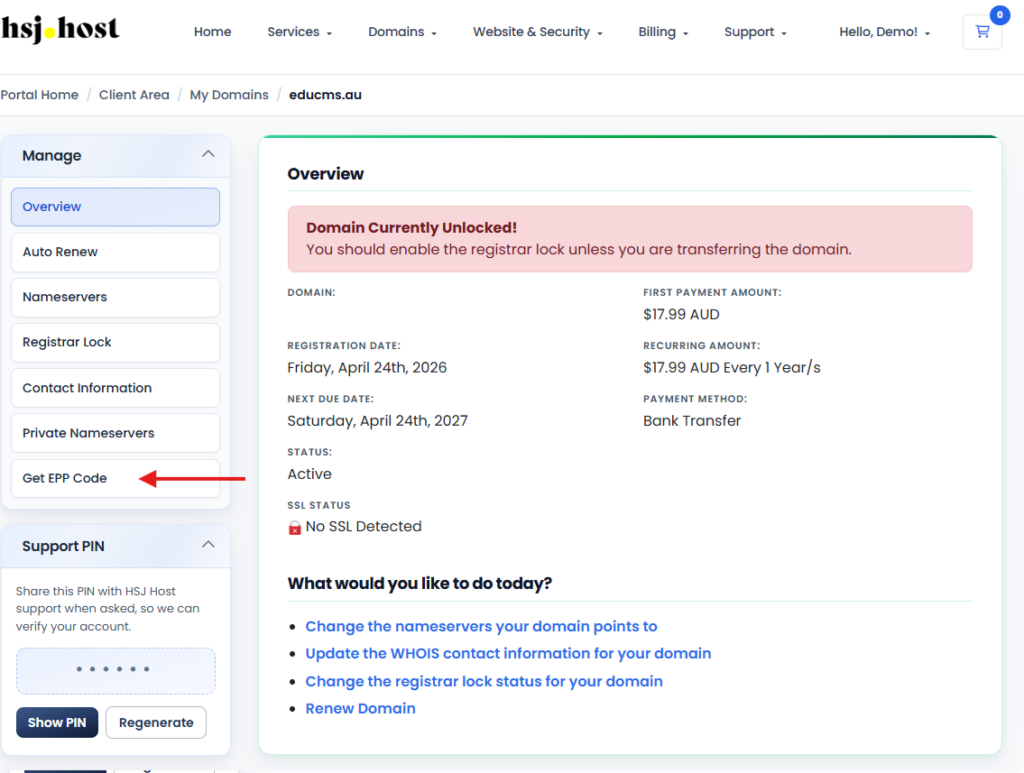
Step 4, find the EPP code option

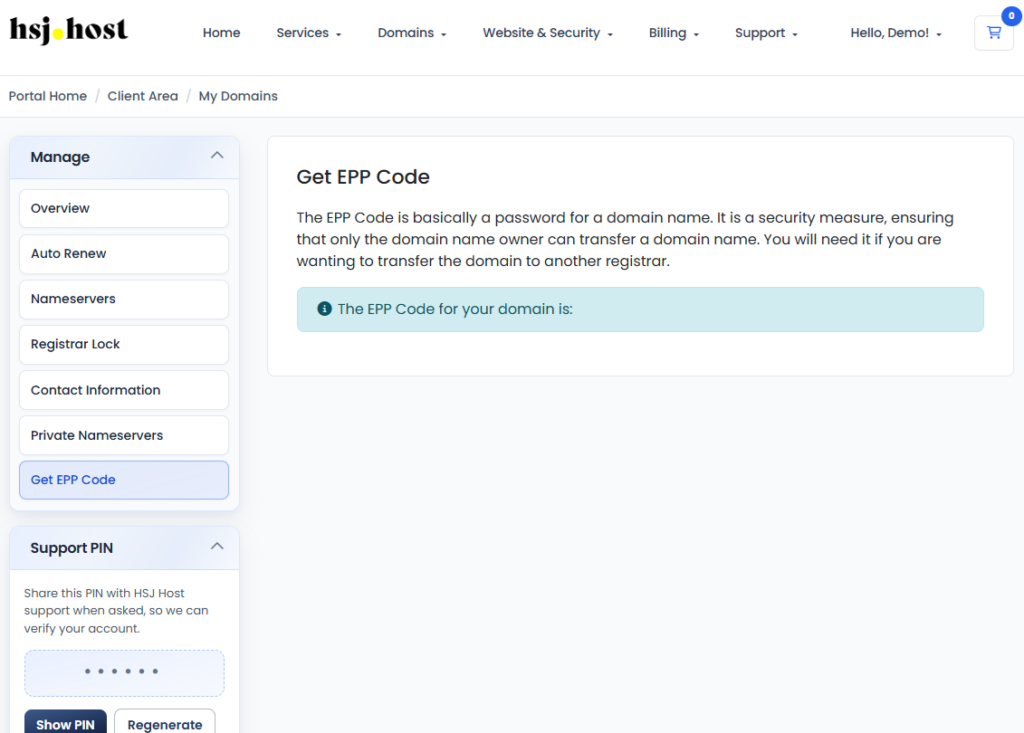
Look for Request EPP Code, Get EPP Code, or Transfer Code, usually found under the Management tab or alongside the Registrar Lock setting.
Step 5, request the code

Click the button to request the code. Depending on the domain extension, it may appear directly on screen, or be sent to the domain’s registered contact email instead.
Step 6, use the code with your new registrar

Copy the code exactly as shown, extra spaces or missing characters are a common reason transfers get rejected, and enter it wherever your new registrar asks for the authorisation or EPP code.

What happens after you submit the EPP code

Once your new registrar has the correct code and your domain isn’t locked, the transfer request goes through. Most transfers complete within five to seven days, though this can vary by domain extension. You may receive a confirmation email at some point during the process, and it’s worth approving that promptly if asked, since an unapproved transfer can stall or be automatically rejected after a set period.

Things to keep in mind

  • EPP codes are usually case sensitive, so copy and paste rather than retyping them
  • A code that’s been generated still works even if you don’t use it right away, but registrars often recommend requesting a fresh one if some time has passed
  • Getting an EPP code doesn’t start a transfer or change anything about your domain by itself, it’s just the first step
  • If your domain is on privacy protection, the EPP code still works the same way, privacy settings don’t affect transfers

Troubleshooting

I can’t find the EPP code option in the portal

Its exact location can vary slightly depending on the domain extension. If you can’t find it, our support team can generate it for you.

My new registrar says the EPP code is invalid

Double check for extra spaces or characters copied along with the code, and confirm Registrar Lock is switched off. If it still doesn’t work, request a fresh code, as some registries expire old ones after a certain period.

I never received the EPP code by email

Check the contact email listed against the domain is correct and check your spam folder. If it still hasn’t arrived, reach out to support and we can confirm or resend it.

Need a hand?

If you’re partway through a domain transfer and need help getting your EPP code, or something’s not going to plan, the HSJ Host support team is available 24/7 through the client portal or by calling 1800 519 724.
How to Turn Auto Renew On and Off for Your Domain on the HSJ Host Portal

Auto Renew controls whether your domain renews automatically when it’s due to expire. Leaving it on is the safer option for most people, since it means one less date to keep track of, but there are times you might want to turn it off. Here’s what it does and how to change it in the HSJ Host client portal.

What is Auto Renew?

Auto Renew is a setting attached to each domain in your account that determines what happens as the domain approaches its expiry date. When it’s switched on, the domain renews automatically using your saved payment method, and you keep the domain without needing to do anything. When it’s switched off, the domain won’t renew on its own, and you’ll need to renew it manually before it expires.

It’s worth keeping in mind that a domain expiring isn’t always immediate or final. Most registries allow a short grace period after expiry, but renewing late can come with extra fees, and if the domain isn’t renewed at all within the allowed window, it can eventually be released and become available for anyone else to register. Auto Renew exists mainly to avoid that situation altogether.

Should Auto Renew be on or off?

For most domains, especially ones tied to an active website, email addresses or a business, leaving Auto Renew switched on is the sensible default. It removes the risk of a missed renewal date costing you the domain.

There are a few reasons you might turn it off instead

  • You’re planning to let the domain expire on purpose, for example if you’re no longer using it
  • You’d rather review and pay for renewals manually each time rather than have them charged automatically
  • You’re in the process of transferring the domain away and want to avoid a renewal charge going through beforehand
  • You’re managing a domain on someone else’s behalf and renewals are being handled outside the portal

Outside of those situations, most domain owners are better off leaving it on.

How to turn Auto Renew on or off

Step 1, log in to the client portal

Go to the HSJ Host client portal and log in with your account details.

Step 2, open your domain list

Go to the Domains menu and select My Domains to see every domain on your account.

Step 3, select the domain

Click on the domain you want to update to open its management page.

Step 4, find the Auto Renew setting

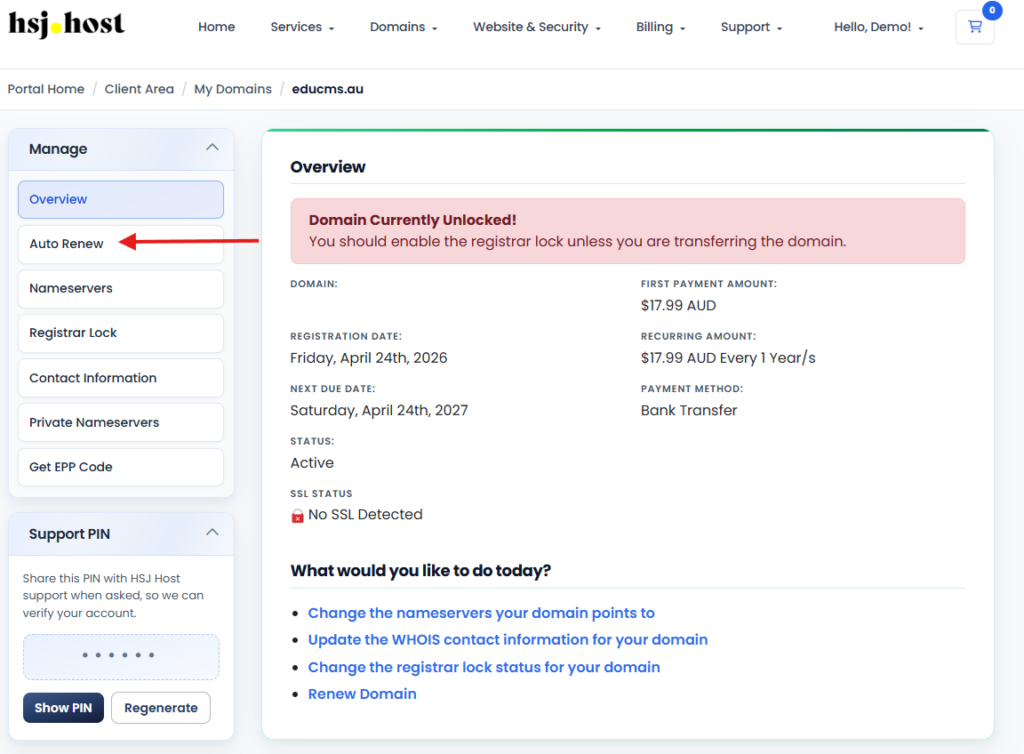
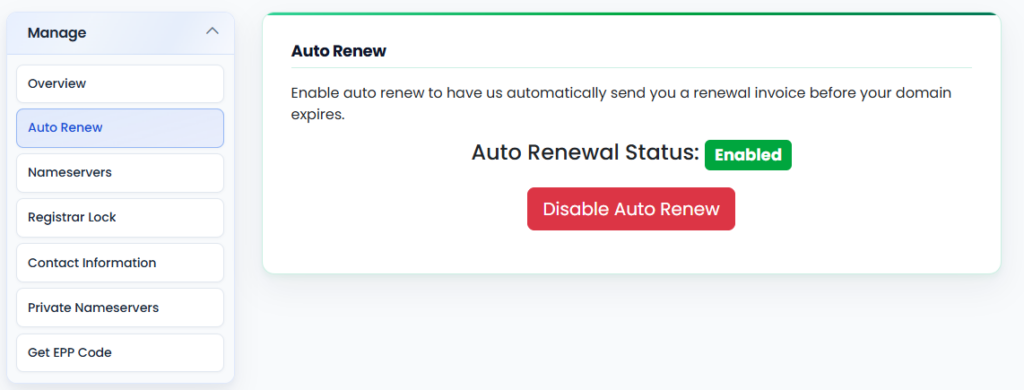
On the domain management page, look for Auto Renew. It’s usually shown as a toggle or switch alongside your domain’s expiry date and other renewal details.

Step 5, switch it on or off

Toggle Auto Renew to whichever setting you want. Some portals will show a confirmation message once the change has been saved.

That’s it, the change applies immediately and will be reflected the next time the domain comes up for renewal.

What happens if Auto Renew is off and your domain expires?

If a domain reaches its expiry date without Auto Renew switched on and hasn’t been renewed manually, it typically moves into a grace period first. During this time it can usually still be renewed, sometimes with a late fee attached depending on the registry and domain extension. If it isn’t renewed within that window, the domain is eventually released and can be registered by someone else, so it’s worth renewing well before the expiry date if Auto Renew is off.

Things to keep in mind

  • Turning Auto Renew on doesn’t charge you anything straight away, it only takes effect at the next renewal date
  • Make sure your saved payment method is current if you’re relying on Auto Renew, a failed payment can mean a renewal doesn’t go through even with the setting switched on
  • You can change this setting as often as you like, there’s no limit or lock-in period
  • Auto Renew is set per domain, so if you manage several domains, check each one individually rather than assuming they’re all set the same way

Troubleshooting

I turned Auto Renew on but I’m not sure it worked

Check the domain management page again to confirm the toggle shows as enabled. If you’re still unsure, our support team can confirm the current setting for you.

My domain didn’t renew even though Auto Renew was on

This is most often caused by a payment method that’s expired or been declined. Check your saved payment details in the billing section of the portal and update them if needed.

Can I turn Auto Renew back on after my domain has expired?

If the domain is still within its grace period, yes, though you may need to complete a manual renewal first before Auto Renew takes effect again for future renewals. If the domain has already been released, it will need to be registered again from scratch, assuming it’s still available.

Need a hand?

If you’d like help checking or changing your Auto Renew settings, or you’ve got a domain approaching expiry and want to make sure everything’s in order, the HSJ Host support team is available 24/7 through the client portal or by calling 1800 519 724.
How to Enable and Disable Registrar Lock on the HSJ Host Portal

Registrar Lock is a simple setting that protects your domain from being transferred away without your permission. Most of the time it should stay switched on, but there are a few situations, like transferring your domain to another provider, where you’ll need to turn it off temporarily. Here’s what it does and how to change it through the HSJ Host client portal.

What is Registrar Lock?

Registrar Lock (sometimes called a transfer lock or domain lock) stops a domain from being moved to another registrar without authorisation. When it’s enabled, any attempt to transfer the domain away will be blocked, even if someone has your domain’s authorisation code.

It’s a security feature rather than something that affects your website or hosting. Your site, email and DNS all continue working exactly as normal whether the lock is on or off, it only comes into play if someone tries to transfer the domain elsewhere.

For most domain owners, leaving Registrar Lock enabled year-round is the safer default. It’s one extra layer of protection against unauthorised transfers, whether that’s from a mistake, a compromised email account, or someone acting in bad faith.

When to disable Registrar Lock

There’s really only one common reason to turn it off, you’re transferring the domain to a different registrar. Domain transfers can’t go through while the lock is active, so it needs to be disabled first.

A few other situations where it might come up

  • You’re consolidating domains under a single registrar
  • You’re moving a domain as part of selling a website or business
  • A previous provider has asked you to unlock the domain before releasing it

Outside of an actual transfer, there’s generally no reason to have it switched off.

How to disable Registrar Lock

Step 1, log in to the client portal

Go to the HSJ Host client portal and log in with your account details.

Step 2, open your domain list

Go to the Domains menu and select My Domains to see every domain on your account.

Step 3, select the domain

Click on the domain you want to unlock to open its management page.

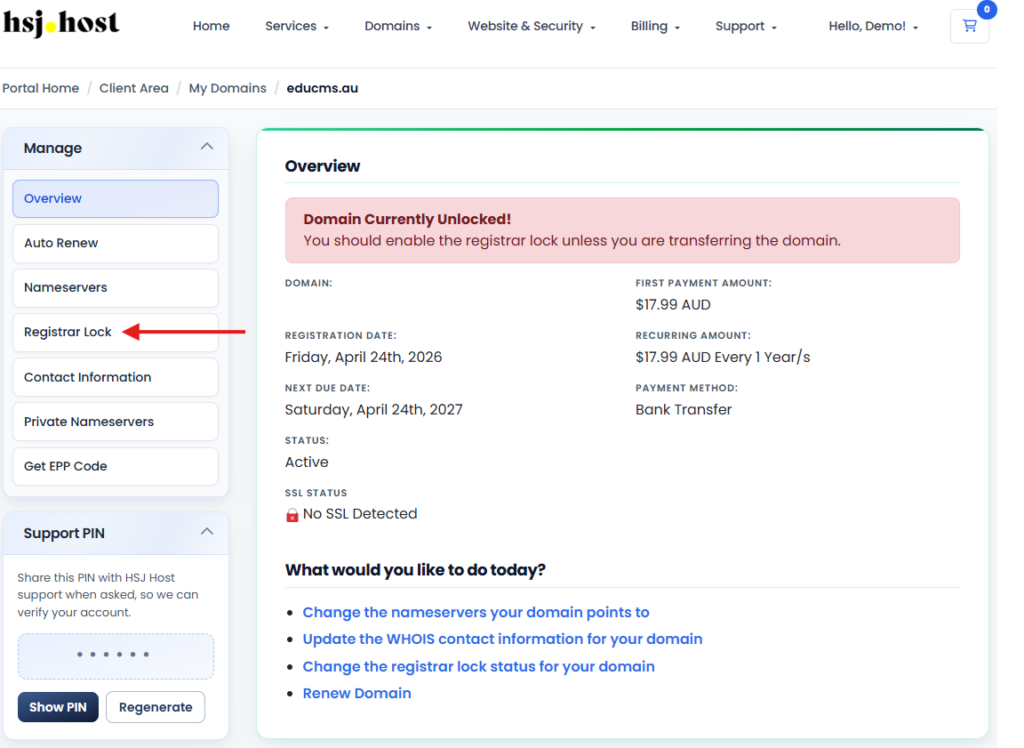
Step 4, find the Registrar Lock toggle

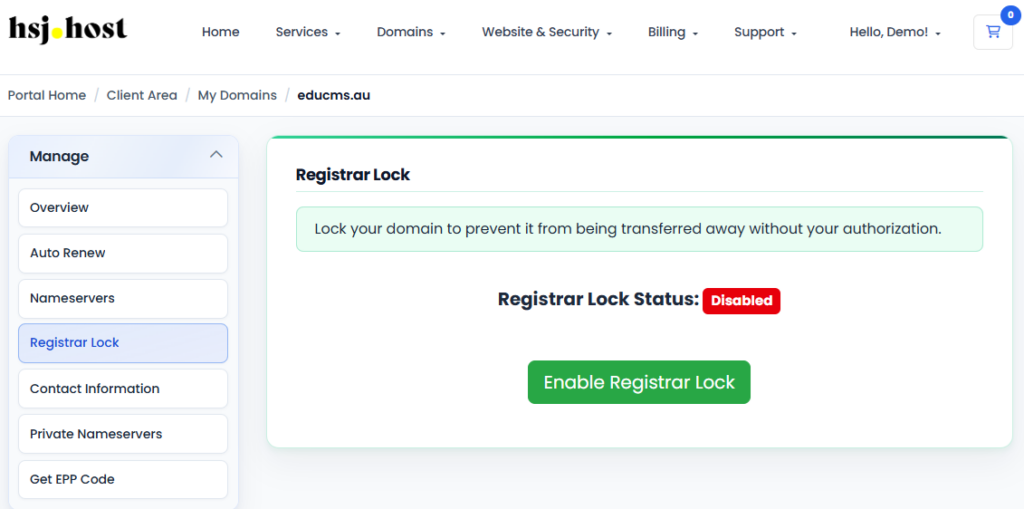
On the domain management page, look for Registrar Lock (this may also appear under a Management or Security tab, depending on your portal layout). You’ll see a toggle or switch showing whether the lock is currently on or off.

Step 5, turn the lock off

Switch the toggle to disable Registrar Lock. Some portals will ask you to confirm the change.

Once it’s off, you’re free to proceed with requesting your domain’s authorisation (EPP) code and starting the transfer with your new registrar.

How to re-enable Registrar Lock

Once a transfer is complete, or if you disabled the lock and no longer need it off, switching it back on takes the same steps in reverse.

Step 1, log in and open the domain

Follow steps 1 to 4 above to get back to the Registrar Lock setting for your domain.

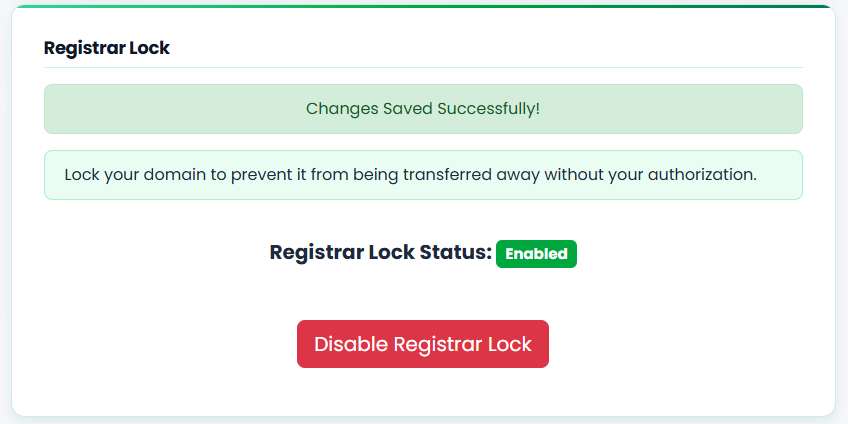
Step 2, turn the lock back on

Switch the toggle to enable Registrar Lock again.

That’s it, your domain is protected against unauthorised transfers again.

Things to keep in mind

  • A domain can’t be transferred out while Registrar Lock is enabled, so if a transfer seems stuck, this is the first thing worth checking
  • Turning the lock off doesn’t start a transfer by itself, it just removes the block so a transfer can go through if one is initiated
  • If you’re not planning to transfer your domain any time soon, there’s no downside to leaving the lock switched on
  • Some registrars apply a short lock automatically after certain changes (like an ownership update), which is separate to this setting and will clear on its own

Troubleshooting

I can’t find the Registrar Lock setting

It’s usually on the main domain management page, but the exact tab name can vary depending on your domain extension. If you can’t locate it, our support team can confirm where it sits or make the change for you.

I disabled the lock but the transfer still failed

Registrar Lock is one of several things that can block a transfer. Double check the domain isn’t within 60 days of registration or a previous transfer, and that you’re using a valid, up to date authorisation code.

Will disabling Registrar Lock affect my website or email?

No. It only affects the ability to transfer the domain to another registrar. Your hosting, DNS, email and website continue running as normal.

Need a hand?

If you’d like help enabling or disabling Registrar Lock, or you’re partway through a domain transfer and something’s not going to plan, the HSJ Host support team is available 24/7 through the client portal or by calling 1800 519 724.
How to Update Your Nameservers on the HSJ Host Portal

If your domain is registered through HSJ Host, updating your nameservers only takes a few minutes through the client portal. This guide walks through the process from start to finish, including where to find the right screen and what to expect once you’ve made the change.

If you’re not sure which nameservers to use for your account, check our guide on HSJ Host’s nameservers for cPanel hosting first, then come back here for the steps.

Before you start

A couple of things to check before making any changes.

  • Make sure you know which nameservers you need. Most standard cPanel hosting accounts use ns1.whitelabelhostingplatform.com and ns2.whitelabelhostingplatform.com, while reseller hosting accounts use ns1.hsj.host and ns2.hsj.host. Your welcome email will confirm which pair applies to your account.
  • Nameserver changes take some time to fully propagate, generally a few hours, sometimes up to 48 hours. Try to make the change during a quiet period for your website rather than in the middle of a launch or campaign.
  • This guide covers domains registered through HSJ Host. If your domain sits with a different registrar, you’ll need to update the nameservers there instead, though the general steps are similar.

Step 1, log in to the client portal

Head to the HSJ Host client portal and log in with your account email and password.

Step 2, open your domain list

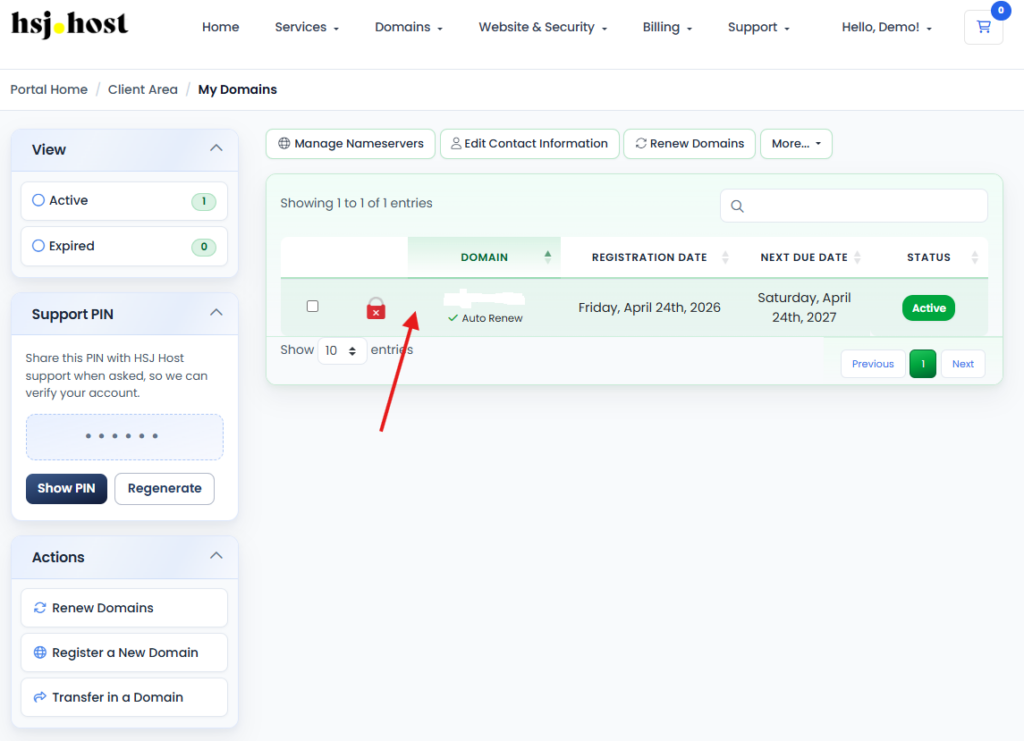
Once logged in, go to the Domains menu and select My Domains. This brings up a list of every domain registered or managed under your account.

Step 3, select the domain you want to update

Find the domain you want to change and click on it to open its management page.

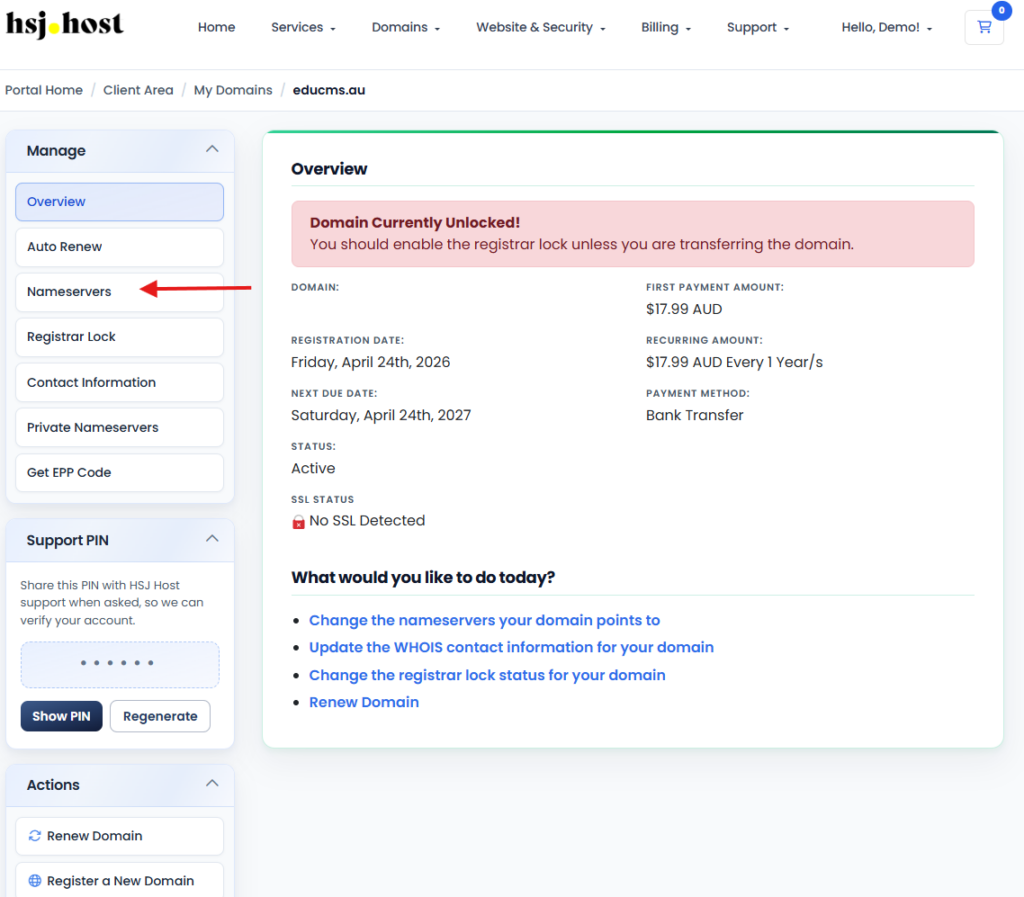
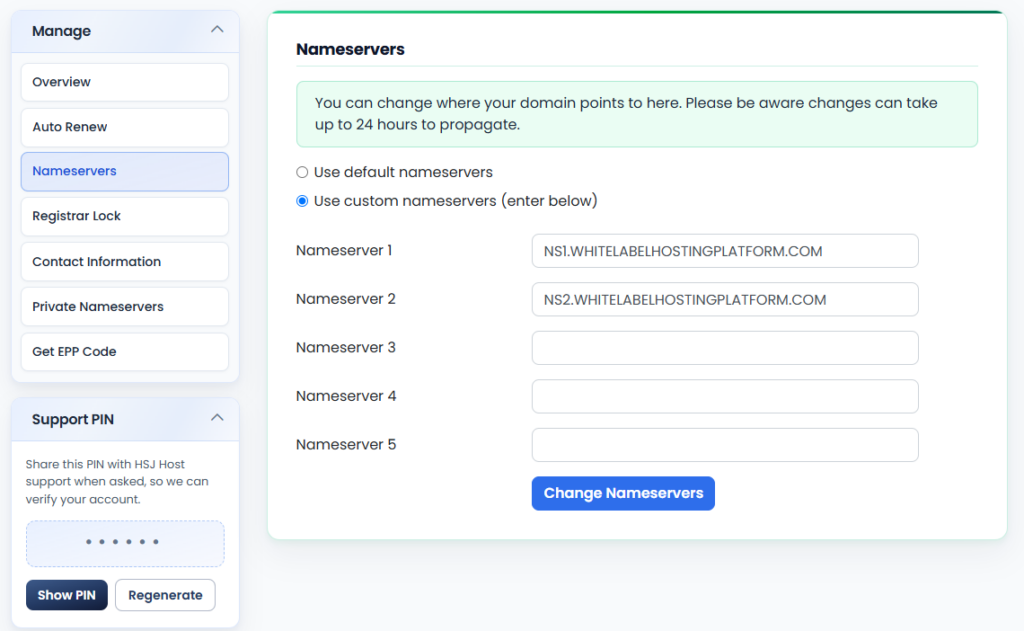
Step 4, find the nameservers tab

On the domain management page, look for the Nameservers tab. This is where your domain’s current nameservers are listed.

Step 5, enter the new nameservers

Clear out the existing entries and enter the correct nameservers for your hosting account, one in each field. Double check for typos here, an incorrect nameserver is one of the most common reasons a domain stops resolving correctly.

Step 6, save your changes

Click Change Nameservers (or Save Changes, depending on your portal version) to apply the update. You’ll usually see a confirmation on screen once the change has gone through.

What happens next

Your domain won’t switch over instantly. DNS changes need time to propagate across the internet, and while this is often quick, it can take up to 48 hours in some cases. During that window, it’s normal for your site to load correctly for some visitors and not others, or for you to see an older version of your site briefly. This resolves itself once propagation finishes, no action needed on your part.

Updating nameservers for a domain registered elsewhere

If your domain isn’t registered through HSJ Host, you’ll need to log in to whichever registrar you used instead (GoDaddy and Crazy Domains are common ones in Australia). The steps are broadly similar, look for a domain or DNS management section, find the nameserver settings, and replace them with the HSJ Host nameservers for your account.

Troubleshooting

I updated my nameservers but my site still isn’t loading

This is almost always a propagation delay. Give it up to 48 hours before assuming something’s wrong, and try checking your site from a different network or device in the meantime.

I can’t find the Nameservers tab on my domain

Some domain extensions or registration types display this slightly differently in WHMCS. If you can’t locate it, our support team can point you in the right direction or make the change for you.

I entered the wrong nameservers, how do I fix it?

Just go back through the same steps and re-enter the correct pair. There’s no limit on how many times you can update your nameservers, though frequent changes will extend how long it takes for things to settle.

Need help?

If you’d rather have someone update this for you, or you run into anything unexpected along the way, the HSJ Host support team is available 24/7 through the client portal or by calling 1800 519 724.ers, though frequent changes will extend how long it takes for things to settle.